Introduction to WS2812B LEDs
WS2812B LEDs, also known as Neopixels or Addressable RGB LEDs, are a popular choice for creating stunning light displays and visual effects. These LEDs are individually controllable, allowing you to set the color and brightness of each LED independently. In this comprehensive guide, we will walk you through the process of setting up and interfacing WS2812B LEDs with various microcontrollers and development boards.
What are WS2812B LEDs?
WS2812B LEDs are intelligent RGB LEDs that integrate a control circuit and a high-brightness RGB chip into a single package. Each LED has three LEDs (red, green, and blue) and a driver IC, which allows for individual control of each LED’s color and brightness. WS2812B LEDs are chainable, meaning you can connect multiple LEDs in series and control them using a single data line.
Advantages of WS2812B LEDs
- Individual control of each LED’s color and brightness
- Chainable, allowing for easy expansion and control of multiple LEDs
- Low power consumption compared to traditional RGB LEDs
- Compact size and easy integration into projects
- Wide range of applications, including lighting, displays, and wearable electronics
Hardware Requirements for WS2812B Setup
To get started with WS2812B LEDs, you will need the following hardware components:
- WS2812B LED strip or individual LEDs
- Microcontroller or development board (e.g., Arduino, ESP8266, ESP32, Raspberry Pi)
- Power supply (5V DC)
- Breadboard and jumper wires (for prototyping)
- Resistor (470 ohms or 220 ohms)
- Capacitor (1000 μF)
Choosing the Right Power Supply
When selecting a power supply for your WS2812B LEDs, consider the following factors:
- Voltage: WS2812B LEDs require a 5V DC power supply.
- Current: Each LED can draw up to 60mA at full brightness (white color). Calculate the total current requirement based on the number of LEDs in your project.
- Power rating: Ensure that your power supply can provide sufficient power for your LED setup. Use the formula: Power (W) = Voltage (V) × Current (A).
For example, if you have a strip of 60 WS2812B LEDs, the maximum current draw would be:
60 LEDs × 60mA = 3.6A
Therefore, you would need a 5V power supply capable of delivering at least 3.6A (18W).
Wiring WS2812B LEDs
The wiring of WS2812B LEDs is relatively simple and consists of three main connections:
- VCC (5V)
- GND (Ground)
- DIN (Data In)
Wiring Diagram
Here is a basic wiring diagram for connecting WS2812B LEDs to an Arduino:
   Arduino       WS2812B LED Strip
   ------        -----------------
    5V     ->    VCC
    GND    ->    GND
    Pin 6  ->    DIN
Schematic
| Arduino | WS2812B LED Strip |
|---|---|
| 5V | VCC |
| GND | GND |
| Pin 6 | DIN |
Important Wiring Considerations
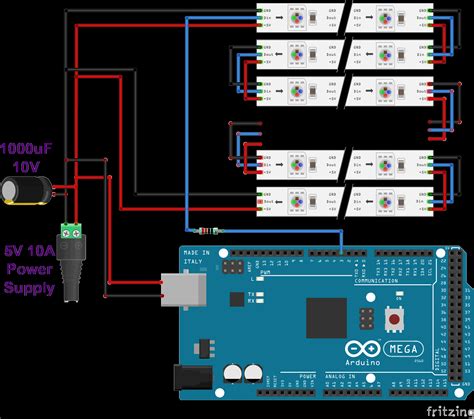
- Always connect a capacitor (1000 μF) between the VCC and GND pins of the LED strip to stabilize the power supply and prevent voltage spikes.
- Use a resistor (470 ohms or 220 ohms) between the data pin of the microcontroller and the DIN pin of the first LED to protect the microcontroller and ensure reliable data transmission.
- If using a long LED strip or multiple strips, consider using a separate power supply for the LEDs to avoid overloading the microcontroller’s power supply.

Software Setup for WS2812B LEDs
To control WS2812B LEDs with a microcontroller, you will need to use a library that supports the WS2812B protocol. There are several popular libraries available for different microcontrollers and development boards.
Arduino
For Arduino, you can use the FastLED or Adafruit NeoPixel library. Here’s how to install and use the FastLED library:
- Open the Arduino IDE.
- Go to Sketch -> Include Library -> Manage Libraries.
- Search for “FastLED” and install the library.
- Include the library in your sketch:
#include <FastLED.h>
- Define the number of LEDs and the data pin:
#define NUM_LEDS 60
#define DATA_PIN 6

CRGB leds[NUM_LEDS];
- Initialize the LED strip in the
setup()function:
void setup() {
  FastLED.addLeds<WS2812B, DATA_PIN, GRB>(leds, NUM_LEDS);
}
- Set the color and brightness of individual LEDs in the
loop()function:
void loop() {
  leds[0] = CRGB::Red;
  leds[1] = CRGB::Green;
  leds[2] = CRGB::Blue;
  FastLED.show();
  delay(1000);
}
ESP8266 and ESP32
For ESP8266 and ESP32, you can use the NeoPixelBus library. Here’s how to install and use it:
- Open the Arduino IDE.
- Go to Sketch -> Include Library -> Manage Libraries.
- Search for “NeoPixelBus” and install the library.
- Include the library in your sketch:
#include <NeoPixelBus.h>
- Define the number of LEDs, data pin, and LED type:
#define NUM_LEDS 60
#define DATA_PIN 6

NeoPixelBus<NeoGrbFeature, Neo800KbpsMethod> strip(NUM_LEDS, DATA_PIN);
- Initialize the LED strip in the
setup()function:
void setup() {
  strip.Begin();
  strip.Show();
}
- Set the color and brightness of individual LEDs in the
loop()function:
void loop() {
  strip.SetPixelColor(0, RgbColor(255, 0, 0));
  strip.SetPixelColor(1, RgbColor(0, 255, 0));
  strip.SetPixelColor(2, RgbColor(0, 0, 255));
  strip.Show();
  delay(1000);
}
Raspberry Pi
For Raspberry Pi, you can use the rpi_ws281x library. Here’s how to install and use it:
- Install the library using pip:
sudo pip3 install rpi_ws281x
- Create a new Python file and import the library:
from rpi_ws281x import *
- Define the number of LEDs, data pin, and LED type:
LED_COUNT = 60
LED_PIN = 18
LED_FREQ_HZ = 800000
LED_DMA = 10
LED_BRIGHTNESS = 255
LED_INVERT = False
LED_CHANNEL = 0

strip = Adafruit_NeoPixel(LED_COUNT, LED_PIN, LED_FREQ_HZ, LED_DMA, LED_INVERT, LED_BRIGHTNESS, LED_CHANNEL)
- Initialize the LED strip:
strip.begin()
- Set the color and brightness of individual LEDs:
strip.setPixelColor(0, Color(255, 0, 0))
strip.setPixelColor(1, Color(0, 255, 0))
strip.setPixelColor(2, Color(0, 0, 255))
strip.show()
Programming Animations and Effects
With WS2812B LEDs, you can create a wide range of animations and effects by manipulating the color and brightness of individual LEDs over time. Here are a few examples:
Rainbow Effect
The rainbow effect creates a smooth transition of colors across the LED strip. Here’s an example using the FastLED library on Arduino:
void rainbow() {
  for (int i = 0; i < NUM_LEDS; i++) {
    leds[i] = CHSV(i * 255 / NUM_LEDS, 255, 255);
  }
  FastLED.show();
  delay(20);
}
Breathing Effect
The breathing effect creates a pulsating light that slowly fades in and out. Here’s an example using the NeoPixelBus library on ESP8266:
void breathing() {
  for (int i = 0; i < 255; i++) {
    for (int j = 0; j < NUM_LEDS; j++) {
      strip.SetPixelColor(j, RgbColor(i, i, i));
    }
    strip.Show();
    delay(10);
  }

  for (int i = 255; i >= 0; i--) {
    for (int j = 0; j < NUM_LEDS; j++) {
      strip.SetPixelColor(j, RgbColor(i, i, i));
    }
    strip.Show();
    delay(10);
  }
}
Running Lights Effect
The running lights effect creates a sequence of lights that appear to move along the LED strip. Here’s an example using the rpi_ws281x library on Raspberry Pi:
def running_lights(strip, color, wait_ms=50):
    for i in range(strip.numPixels()):
        strip.setPixelColor(i, color)
        strip.show()
        time.sleep(wait_ms / 1000.0)
        strip.setPixelColor(i, Color(0, 0, 0))
Advanced Topics
Using Multiple LED Strips
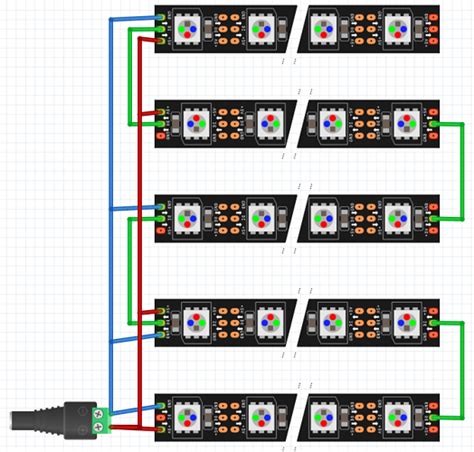
To use multiple LED strips with a single microcontroller, you can connect them in series or parallel, depending on your power supply and data pin configuration.
For series connection, connect the DOUT pin of the first strip to the DIN pin of the second strip, and so on. This allows you to control all the strips using a single data pin.
For parallel connection, you will need to use a separate data pin for each strip. This provides more flexibility in controlling individual strips but requires more microcontroller pins.
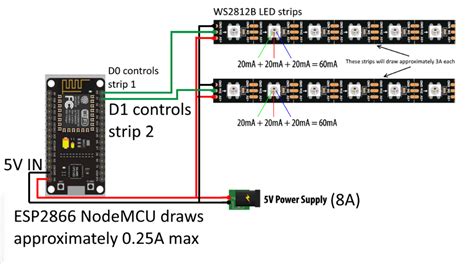
Controlling WS2812B LEDs with a Web Interface
You can create a web interface to control your WS2812B LEDs remotely using a microcontroller with Wi-Fi capabilities, such as the ESP8266 or ESP32.
- Set up a web server on your microcontroller using libraries like ESPAsyncWebServer or ESP8266WebServer.
- Create HTML, CSS, and JavaScript files for your web interface, allowing users to select colors, patterns, and brightness.
- Handle incoming requests from the web interface and update the LED strip accordingly.
Here’s a simple example using the ESPAsyncWebServer library on ESP8266:
#include <ESPAsyncWebServer.h>
#include <NeoPixelBus.h>

#define NUM_LEDS 60
#define DATA_PIN 6

NeoPixelBus<NeoGrbFeature, Neo800KbpsMethod> strip(NUM_LEDS, DATA_PIN);

AsyncWebServer server(80);

void setup() {
  strip.Begin();
  strip.Show();

  WiFi.begin("your_ssid", "your_password");
  while (WiFi.status() != WL_CONNECTED) {
    delay(1000);
  }

  server.on("/", HTTP_GET, [](AsyncWebServerRequest *request) {
    request->send(200, "text/html", "<html><body><h1>WS2812B Control</h1><form action='/color' method='post'><input type='color' name='color'><br><input type='submit' value='Set Color'></form></body></html>");
  });

  server.on("/color", HTTP_POST, [](AsyncWebServerRequest *request) {
    if (request->hasParam("color")) {
      String colorString = request->getParam("color")->value();
      uint32_t color = strtol(colorString.substring(1).c_str(), NULL, 16);

      for (int i = 0; i < NUM_LEDS; i++) {
        strip.SetPixelColor(i, RgbColor(color));
      }
      strip.Show();
    }
    request->redirect("/");
  });

  server.begin();
}

void loop() {
  // Your loop code here
}
Frequently Asked Questions (FAQ)
- Can I power WS2812B LEDs directly from my microcontroller?
-
It is generally not recommended to power WS2812B LEDs directly from a microcontroller, as they can draw a significant amount of current. It is better to use a separate 5V power supply to power the LEDs and connect the ground of the power supply to the ground of the microcontroller.
-
How many WS2812B LEDs can I control with a single microcontroller?
-
The number of WS2812B LEDs you can control depends on the memory and processing power of your microcontroller. An Arduino Uno, for example, can typically control around 500-1000 LEDs, while more powerful microcontrollers like the ESP32 can handle a few thousand LEDs.
-
Can I mix different types of WS2812B LEDs in the same project?
-
Yes, you can mix different types of WS2812B LEDs (e.g., different sizes or form factors) in the same project as long as they share the same data and power connections. However, ensure that your power supply can handle the total current draw of all the LEDs.
-
How do I calculate the power requirements for my WS2812B LED project?
-
To calculate the power requirements, multiply the number of LEDs by the maximum current draw per LED (usually 60mA for full brightness white) and then multiply the result by the supply voltage (5V). For example, 100 LEDs at full brightness would require: 100 × 0.06A × 5V = 30W.
-
Can I control WS2812B LEDs with a Raspberry Pi?
- Yes, you can control WS2812B LEDs with a Raspberry Pi using the rpi_ws281x library. Connect the data line of the LEDs to a GPIO pin (e.g., GPIO18) and ensure that you have a sufficient power supply connected to the LEDs.
Conclusion
In this comprehensive guide, we have covered the basics of setting up and interfacing WS2812B LEDs with various microcontrollers and development boards. We discussed hardware requirements, wiring, software setup, and programming animations and effects. Additionally, we explored advanced topics such as using multiple LED strips and controlling LEDs with a web interface.
With the knowledge gained from this guide, you should be well-equipped to start creating your own stunning light displays and interactive projects using WS2812B LEDs. Remember to always consider power requirements, data connections, and safe wiring practices when working with these LEDs.
As you continue to explore the world of addressable RGB LEDs, don’t be afraid to experiment with different animations, color schemes, and control methods. The possibilities are endless, and the creative potential of WS2812B LEDs is limited only by your imagination.
Happy tinkering and lighting up your projects with WS2812B LEDs!
Leave a Reply